Scan the WeChat code to contact us
Scan the WeChat code to contact us
Welcome to RCDronego — Shop practical drones for different flying needs.
 Bywpdev
Cinematic drone video is less about flying far and more about flying smoothly. Beginners should start with open outdoor space, a clear GPS lock on supported drones, slow stick movement, simple camera angles, and one clean subject. Use long, steady moves instead of fast turns. Keep the drone within visual line of sight, watch wind and battery level, and avoid chasing the maximum listed range. A stable 4K drone with GPS support, EIS, or a gimbal can produce better beginner footage than a higher-spec drone flown too aggressively.
If you want to learn how to shoot cinematic drone video, the first lesson is simple: slow footage usually looks more expensive than fast footage. Most beginner drone videos look rough because the pilot turns too quickly, changes altitude too often, or tries to capture everything in one flight.
A cinematic drone shot usually has one clear subject, one smooth camera movement, and enough time for the viewer to understand the scene. You do not need advanced filmmaking experience to start. You need stable flying habits, a sensible location, and a few repeatable shot patterns.
This guide walks through the beginner workflow step by step: how to prepare the drone, how to fly smoother, which camera moves to practice first, and how to avoid the mistakes that make aerial footage feel shaky or rushed.
The easiest place to shoot cinematic drone video is not a crowded city street or a tight backyard. It is an open outdoor area with a clear subject and enough room for slow movement. Good beginner subjects include a lake, field, beach, hill, road, small bridge, open park, or a single building from a safe distance.
For supported GPS drones, open sky also helps the drone hold position more confidently. GPS positioning cannot make a bad shot cinematic, but it helps reduce drifting while you focus on framing and movement.
Before takeoff, ask one question: What is the viewer supposed to look at? If the answer is unclear, the shot will feel random even if the drone camera is sharp.
| Beginner Scene | Why It Works for Drone Video | Simple Shot Idea |
|---|---|---|
| Lake or coastline | Clean horizon and natural movement | Slow forward push over water |
| Open field | Low obstacle risk and wide framing | Rising reveal from low to high |
| Road or path | Strong leading line | Follow the line slowly from above |
| Small building or cabin | Clear subject for framing | Orbit slowly from a safe distance |
| Hill or viewpoint | Good depth and background layers | Pull back to reveal the landscape |
Safety note: In the U.S., recreational flyers are required to keep the drone within visual line of sight, or use a co-located visual observer when flying first-person view. Rules vary by country, so always check local requirements before flying.
Many beginners take off first and think about the shot later. That usually leads to rushed footage. Before the first move, confirm the basic camera setup and live-view comfort.
A built-in screen remote can make this easier because the live view is already part of the controller. A phone app can also work well, but glare, connection quality, and screen brightness can affect how confidently you frame the shot outdoors.
If your drone has an adjustable camera angle, set it before the move begins. A slight downward angle often works better for beginner cinematic footage because it shows both the subject and the landscape. Straight-forward framing can work for horizon shots, but it may look flat if there is no strong foreground.
For example, based on the provided RCDronego specifications, the S-X1 pairs 4K@50fps with a 3-axis gimbal and EIS, while the GT6 includes 4K with EIS. These features do not guarantee cinematic footage, but they give beginners a stronger starting point for smoother motion.
The fastest way to make drone footage look more cinematic is to stop combining too many movements. Beginners often push forward, rise, turn, tilt, and pan all in the same few seconds. That makes the footage feel nervous.
Instead, choose one main movement and hold it. Let the drone travel slowly enough that the viewer can enjoy the scene. A clean 8-second shot is more useful than a 30-second clip full of corrections.
| Cinematic Drone Move | How to Fly It | Best Beginner Use |
|---|---|---|
| Slow push-in | Fly forward gently toward the subject | Road, building, lake, bridge |
| Pull-back reveal | Start near the subject, then fly backward and slightly upward | Landscape reveal or travel intro |
| Vertical rise | Rise slowly without turning | Showing the size of a park, beach, or field |
| Side slide | Move left or right while keeping the subject framed | Adding motion to a static scene |
| Slow orbit | Circle the subject from a safe distance | Cabin, vehicle, landmark, open structure |
For your first few flights, avoid diagonal flying, fast yaw turns, and sudden camera tilt. Those moves can look cinematic later, but they are harder to control smoothly as a beginner.
Speed is one of the biggest reasons beginner drone footage looks rough. A drone may be able to fly fast, but cinematic footage usually needs controlled speed, not maximum speed.
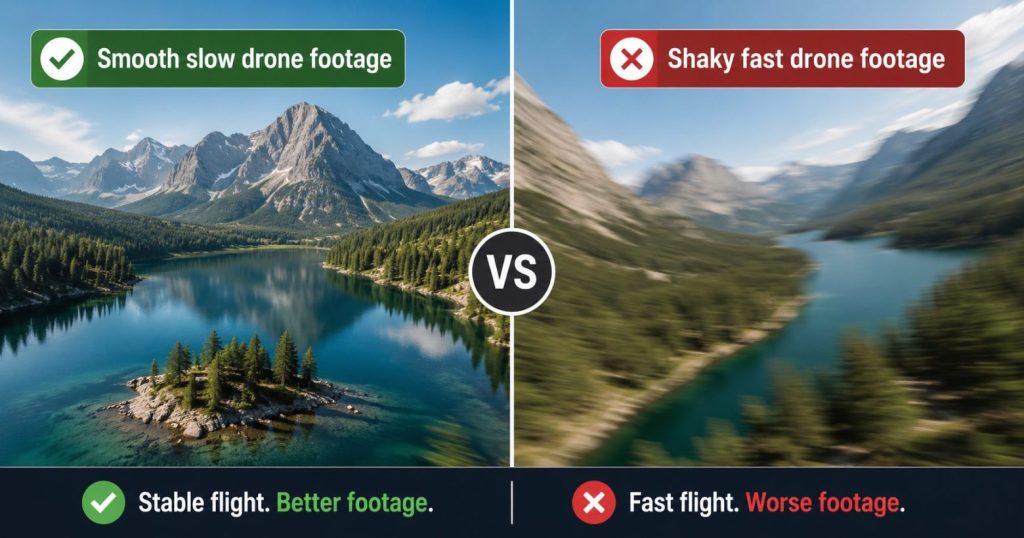
With GPS drones, slower movement gives the positioning system, camera stabilization, and pilot more time to stay smooth. It also reduces the risk of flying into a poor framing angle or getting too close to an obstacle.
If your drone offers multiple speed modes, begin in the slower mode. Practice smooth starts and stops. A sudden stop can be just as distracting as a sudden turn.
Beginner rule: If a shot feels boring while you are flying it, it may look smooth and cinematic when edited. If it feels exciting while you are flying it, it may look too fast on screen.
Models with screen remotes can help here because you can watch the framing while keeping both hands on the controller. For a beginner who wants cinematic outdoor footage, this can be more comfortable than constantly checking a phone mount.
Cinematic drone footage often feels deeper because it includes foreground, subject, and background. A flat shot with only sky and horizon can still be beautiful, but it may not feel dynamic.
If your drone has an adjustable camera or gimbal, use it to create depth. Pointing slightly downward can show the relationship between the subject and the landscape. A higher angle can reveal patterns in roads, coastlines, fields, or water. A lower forward angle can make the shot feel more immersive.
Based on provided RCDronego specifications, AE20 Max and XT808 include 180-degree adjustable lens designs, while S-X1 includes a 3-axis gimbal and EIS. These are different tools. An adjustable lens helps you choose framing; a gimbal is designed to support smoother camera movement.
You do not need dozens of moves to make a beginner drone video look cinematic. Start with six repeatable shots. These are simple enough for new pilots but still useful in travel edits, product clips, outdoor reels, and YouTube intros.
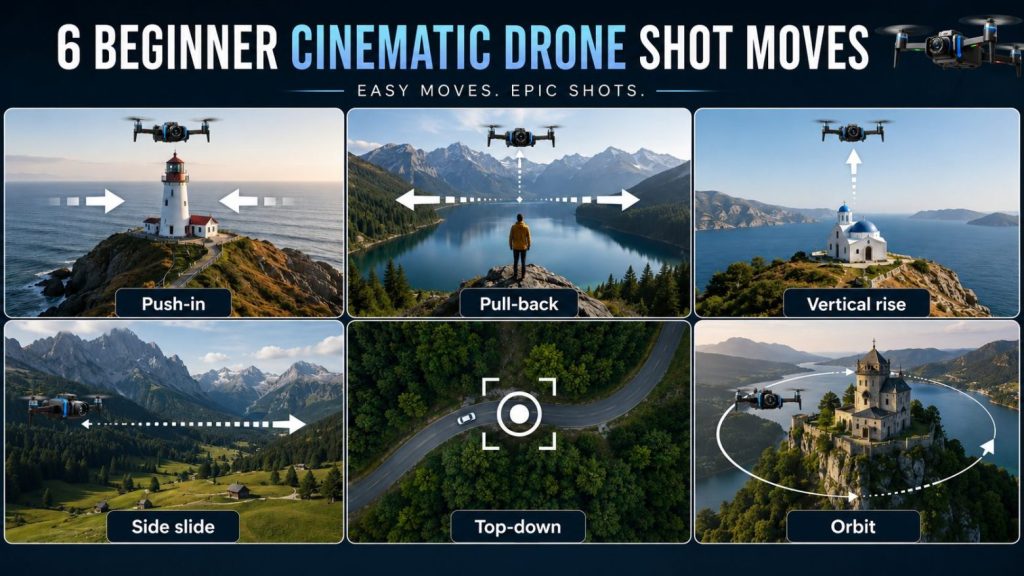
| Shot | Drone Movement | Beginner Tip |
|---|---|---|
| Opening reveal | Start low, rise slowly | Keep the drone steady and avoid turning |
| Forward glide | Move forward toward the subject | Use a slow speed and keep the subject centered |
| Pull-back reveal | Fly backward and slightly upward | Check behind the drone before starting |
| Side slide | Move sideways across the scene | Use a strong foreground or background line |
| Top-down pattern | Point camera downward and move slowly | Look for roads, waves, fields, or paths |
| Safe orbit | Circle around a clear subject | Keep distance wide and speed low |
Do each shot twice. The first attempt is for learning the path. The second attempt is usually smoother. Beginners often improve more by repeating one simple move than by trying five different advanced moves in one battery.
Most beginner drone footage looks less cinematic for the same few reasons. The camera may be sharp, but the flight movement is not controlled enough.
Do not chase listed maximum distance while filming. Listed control range and transmission distance depend on conditions such as interference, terrain, battery condition, wind, and pilot behavior. Good cinematic video usually happens when the drone is close enough for confident control and clean framing.
If your main goal is cinematic drone video, choose features that support stable footage instead of focusing only on resolution. A camera label matters, but the drone still has to move smoothly.
| Feature | Why It Helps Cinematic Drone Video | Beginner Priority |
|---|---|---|
| GPS positioning | Helps hold position outdoors and reduces drifting | High |
| Return-to-home | Adds a recovery feature before flying farther | High |
| EIS | Helps reduce electronic shake in video | High |
| 3-axis gimbal | Supports smoother camera movement and framing | High when available |
| Screen remote | Makes live framing easier outdoors | Medium to high |
| Adjustable camera angle | Helps create better composition and depth | Medium |
| Long listed range | Useful for flexibility but not required for beginner cinematic shots | Medium |
If you want a camera-focused option with stabilization, the S-X1 is the most relevant RCDronego model to review because its provided specifications include 4K@50fps, a 3-axis gimbal, EIS, digital transmission, and a screen remote. For a broader shopping path, compare models in the Camera Drones collection.
A cinematic drone video does not need to be long. A simple three-shot sequence can look stronger than one long unplanned flight. Think like an editor before takeoff.
| Shot Order | Purpose | Beginner Drone Move |
|---|---|---|
| Shot 1 | Establish the scene | Slow vertical rise or wide forward glide |
| Shot 2 | Show the subject | Side slide or slow push-in |
| Shot 3 | Reveal scale or ending view | Pull-back reveal or top-down pattern |
For example, if you are filming a lake, start with a slow rise from the shoreline, then push forward over the water, then pull back to reveal the full shoreline and hills. Keep each shot simple. The sequence creates the cinematic feeling, not one complicated move.
If you are still learning GPS-assisted flight, review how recovery behavior works in our GPS drone return-to-home guide before filming farther from your takeoff point.
Do not wait until you get home to find out that every shot was too fast, too tilted, or too shaky. Before packing up, review a few clips on the screen remote, phone, or controller display.
Look for three things: stable movement, clear subject, and usable beginning and ending. A good clip needs a clean start and a clean finish. If the first two seconds are shaky but the middle looks good, you can still trim it. If the whole shot is rushed, record it again while you are still there.
Most beginner cinematic footage improves after one re-take. The pilot becomes calmer, the subject is clearer, and the second movement is usually smoother.
Beginners should shoot cinematic drone video by flying slowly, using one movement per shot, choosing a clear subject, and practicing simple moves like push-ins, pull-back reveals, vertical rises, side slides, and safe orbits. GPS positioning, stabilization, good lighting, and careful framing matter more than fast flying or maximum range.
The most helpful features are stabilization, GPS positioning, a clear live view, adjustable camera angle, and enough battery life to repeat shots. EIS and a 3-axis gimbal can help reduce shake. A screen remote can also make framing easier outdoors because the live view is built into the controller.
Yes. For most beginners, 4K is enough for cinematic drone video, especially for YouTube, social media, travel clips, and family footage. Smooth movement, stabilization, lighting, and composition usually affect the final result more than chasing a higher resolution number.
The easiest cinematic drone move for beginners is a slow forward push-in or a slow vertical rise. Both moves are simple, easy to repeat, and work well in open spaces. Avoid fast turns and complicated combined movements until you can fly smoothly.
A gimbal can matter a lot because it helps keep the camera movement smoother while the drone moves. EIS can also help reduce shake electronically. Beginners can still capture good footage without advanced gear, but a drone with a gimbal or EIS gives a stronger starting point for stable video.
No. Beginners should not chase maximum control range to get cinematic shots. Many strong drone videos are filmed close enough for confident control and clear visual awareness. Listed range can vary by wind, interference, terrain, battery condition, and flying style, so smooth nearby shots are usually a better starting point.
To shoot cinematic drone video as a beginner, do not start by flying faster or farther. Start by flying smoother. Choose a clean subject, use GPS-supported stability when available, keep one movement per shot, and record each move slowly enough to trim later. A stable 4K shot with good framing is usually more cinematic than a fast, shaky clip with higher specs. Practice simple moves first, review your footage before leaving the location, and build your video from clean repeatable shots.